Showing posts with label crafts. Show all posts

Friday, June 14, 2013

Turkey Feather Hat


This is another special holiday hat I cooked up for the niece and nephew.  I think he's kinda cute!  I have never typed up a "pattern" before but I thought this one deserves to be repeated.  I have knit this self-made pattern twice myself but have never had anyone try to replicate it.  Let me know your thoughts!

Hat:
Basic baby hat in worsted weight yarn.  I used Debbie Stoller's Bamboo Ewe in brown.  I used the basic pattern out of Susan B. Anderson's Itty Bitty Hats.

Needles: 16" circular size 7.
               Size 7 double pointed needles for the top

Beak:
Using bits of orange - Vanna White's Pumpkin
Needles: size 3 double pointed needles

CO 20 stitches
Join to work in the round  
Knit 4 rounds even

K3 K2Tog, repeat for one round
K2 K2Tog, repeat for one round
Knit 1 round even
K1 K2Tog, repeat for one round
Knit 1 round even
K2 Tog for round
K2 Tog until only 1 stitch remains.  Pull yarn through the stitch.  Use yarn needle to pull yarn to inside of beak.
Whipstitch beak to center of hat.

*************************
Waddle:
Yarn: Bits of red yarn.  This is Debbie Stoller again.
Needles: Size 3 needles
CO 4 stitches - knit flat
1. KFB, K2 KFB (6)
2. Knit
3. KFB, K4, KFB (8)
4. Knit
5. K2Tog, K2Tog, K2Tog, K2Tog (4)
6. K2Tog, K2Tog (2)
7-21: K2 in garter stitch (or to desired length)
22. KFB, KFB (4)
23: Knit
24: KFB, K2, KFB (6)
25: Knit
26:KFB, K4, KFB (8)
27: K2Tog, K2Tog, K2Tog, K2Tog (4)
28: Cut yarn and pull through remaining stitches.

Fold waddle in half and sew onto hat below the beak.
******************************
Turkey Feathers:
Debbie Stoller Stitch Nation Bamboo Ewe - various colors.
Needles:Size 7 double point needles
CO 24 stitches
Join to knit in the round

Rounds 1-4 knit even
5. KFB, KFB, K10, KFB, KFB, K10 (28)
6. Knit
7. KFB KFB, K12, KFB, KFB, K12 (32)
8. Knit
9. Knit
10. K2 K2Tog K12, K2 K2Tog K12 (30)
11. K2, K2Tog K2Tog K9 K2 K2Tog K2Tog K9 (26)
12. K2 K2Tog K2Tog K6 K2 K2Tog K2Tog K6 (22)
13. K2 K2Tog K7 K2 K2Tog K7 (20)
14. K2 K2Tog K6 K2 K2Tog K6 (18)
15. K2 K2Tog K2Tog K3  K2 K2Tog K2Tog K3 (14)
16. K2 K2Tog K2Tog K1 K2 K2Tog K2Tog K1 (10)
17. K2Tog throughout the row (5)
18. K2Tog K2Tog K1 (3)
19. Slip 1 stitch, K2tog, pass slipped stitch over.  Pull yarn through and pull to inside of feather. 

Stuff the feathers with poly-fil and whipstitch in place around the crown. 

On the second one I made I found it easier to "pile" the feathers on the top of the crown so that baby could fit in the carseat.  (I also didn't have enough red yarn to make the waddle for this one.)


Wednesday, March 6, 2013

Quilting

I wanted to buy some cute fabric to make bowties for a friend.  So I went to Patched Works in Elm Grove.  And that was my first mistake.

My friend is due with a baby boy in 5 weeks.  She's a doctor, and her husband is a chemist.  So I asked if they had any dorky science fabric..... look at this quirky and cute Michael Miller print!

Curious Critters by Micheal Miller
Lab Animals in Turquoise
Coordinating binding Atoms in Black.


So I bought a yard of this and a yard of a coordinating print.  I bought blue minky for the back.  Since the print was so perfect I decided not to cut it and just to make a simple quilt.  I used 2 inch tape to mark out my lines and made up my own pattern that just happened to work out perfectly - I got lucky!


There was a little puckering of the minky, but all in all it turned out ok.  I even did my first HAND SEWN BINDING - which was a big deal and did turn out pretty nice (I need to work on the corners though.)  Again, I followed the Oh Fransson tutorials and was pretty happy with the result.  The Mother-to-Be also was quite pleased with it.

I liked this simple quilt.  1 yard of fabric was a perfect baby-sized blanket.  I did it all in about 3 days and would do it again.  I do need to buy some more 2 inch tape before I do another quilt, but it really helps and is super easy.

Tuesday, July 3, 2012

The Nursery

We (I) had a bit of a phobia when it came to decorating the nursery.  Following our losses, I was nervous about anything representing the pregnancy to be so permanent in our house.  We also have only 2 bedrooms, and we host a lot of guests, so the room had to also serve as a guest room.  Therefore we (I) didn't want anything too "babyish" or "girly".  The room we ended up with is (I think) none of those things, and I'm pretty pleased with it overall.
BEFORE
This is the before picture.  Bry finding out the baby's gender.  The bed was arranged in the middle with the cedar chest at foot of the bed.  The bedding is from Ikea - can't find the name of the pattern for the duvet anymore.
Because we live in an apartment we weren't able to paint at all, which I think made us be a little more creative in including colors.
AFTER
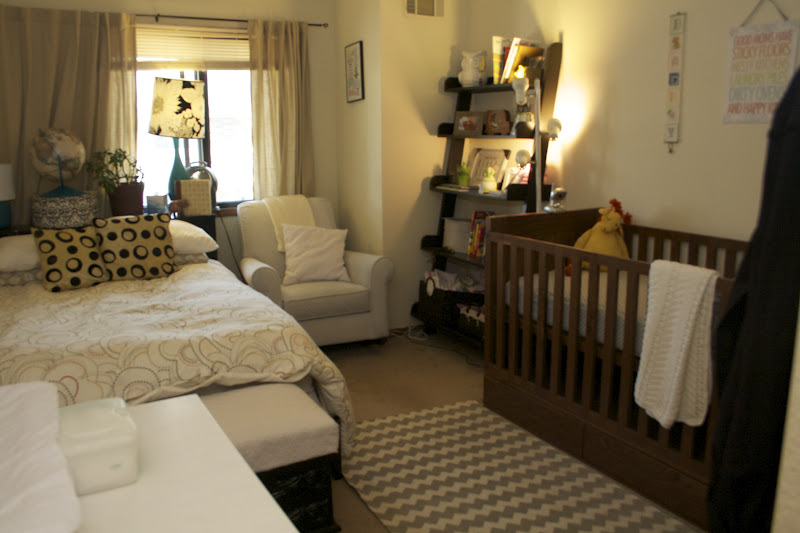
This is the after photo when I finally got around to taking a few photos.  Now I'll go into some details about the items in the room.  Note that the only NEW furniture is the CRIB and the CHAIR. (The bookshelf and table just weren't visible in the before photo.)

1. CRIB
Made by our Brother-in-Law, Brandon Filzen of  
The beautiful craftsmanship is evident in every part of this lovely crib.  At some point I hope to do a post on the crib building process - Brandon has given me all the photos.  He did such a lovely job - basically I found a crib that I liked, gave him a photo and he did the rest.  I will point out that the crib is solid Black Walnut and my favorite feature is the drawer storage underneath the crib.  It is a convertible crib as well to grow with Hannah.
The giraffe is a Susan B. Anderson pattern that I knitted (and finished!) before Hannah was born.

Amazing crib.  Special Uncle.


2. GUEST BED

-Again, the bedding is from Ikea.  

-The throw pillows are covers that I bought in Philippines.  

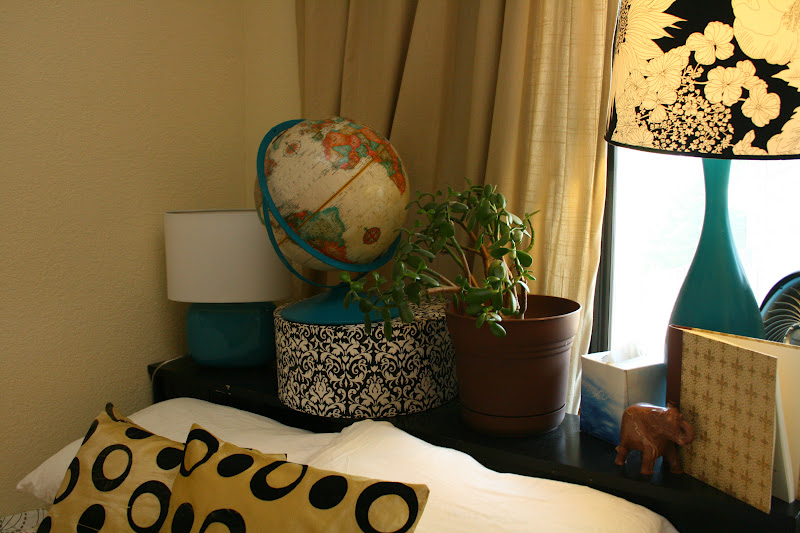
-The right side lamp is from Target, I spray painted it the teal color.  The shade is also from Target. 

 -The Globe I bought at Goodwill - it too, got the spray painting treatment.  The fun part is that it still shows the USSR and the colors on the map part match the teal perfectly.  

-The left side lamp is also purchased from Goodwill but was originally teal so no painting required.

-Guest book is from Germany and not enough people write in it when they stay here!

-Elephant picture - bought from Etsy.com Zeppi Prints. Found the frames at JoAnn Fabrics. Thought about mounting it to canvases but opted not to potentially wreck the prints.


3. Bookshelf
 This bookshelf has a TON of stuff on it which I had been accumulating before Hannah was born.  The books were largely gifts.  I will talk about a few items:
OWL - purchased from Burlington Coat Factory for $12
TRUCK BANK - Bry's from when he was a little boy - I LOVE that this is in Hannah's room.  The "belly" is see through so you can see the money, but have to undo screws in order to get it out.  Just love this piece.
ELEPHANT BANK - purchased from Urban Outfitters for $12.  Loved the color, loved the shape.  There is an elephant theme in Hannah's room (loosely).

4. CHANGING TABLE
-Table was bought off of Craigslist for <$10.  Originally it is from Ikea.  The changing pad was bought at a store that went out of business.  

-Rug: another Urban Outfitters purchase.  I saw another nursery with the same rug on Pinterest and went straight to Urban Outfitters to buy it.  It is a canvas like rug, not soft and squishy but that's ok because the carpet in her room is in pretty good condition.
 
-Elephant Wall Hooks: purchased from Etsy.com The Shabby Shak.  I see now that she has some huge mounted elephant heads - now I need the will power to not buy them........


-I also have a lot of needle point in the room.  Some of it is very special- made by my mother.  The wall hanging over the crib was made by Bry's Grandma Swenson and was in his room as a baby.  LOVE that too.  This piece was a sampler I found at a thrift store for < $1.  I like the vintage stitching in the modern frame.

5. Chair
This was my dream chair from when I started nannying.  A sort of "push present" to myself.  We ended up buying it in Dallas, TX so we could actually sit in the chairs before buying them.  It is actually a light grey color and we really like it.

There's the nursery!  We are liking it a lot, and it has worked well hosting many guests after Hannah was born (she sleeps in a bassinet in our room - a post will follow on that too!).

Sunday, February 26, 2012

Accomplishments

Well my restful month has almost come to a close.  I have today off, then work Monday and Tuesday.  Wednesday I have a big test for residency (in Emergency Medicine), but I do have Wed afternoon-Friday off.  Then it's just 3 shifts until we leave for TX!

So what did I accomplish this month?  I set some goals for myself and I think I did OK.

1. Pier VIII.  This is a 450 question and answer session that I used to study for my test.  Between December and now I finished ALL 450 questions.  I have the test on Wednesday and am hoping to do better than I did last year (not very good).

2. Alex's Scarf: FINISHED.  I had promised it would be in the mail, it is not.  However, it is downstairs near the mailing envelopes and that is pretty darn close to being in the mail.

3. Lucas's Sweater: Just have one more sleeve, hood and finishing to go.  I'm trading off working on this sweater and the Little Jockey Wrap.  So this sweater is up next and the second sleeve will be going on the needles tonight. (If only there were an episode of Downton Abbey to watch whilst knitting....)  I've made a modification to this pattern - it really PEEVES me having to sew up pieces so I'm knitting the sleeves in the round.  If I were to re-make this sweater I would try to knit the entire bottom in the round up to the arm holes to save myself some grief - but I'll admit that I'm not entirely sure how I would knit the pocket while knitting in the round.

For Non Knitters: Knitting in the Round means basically knitting a tube instead of knitting flat pieces.  Think of all sweaters, hats and sleeves as tubes.  Now, you CAN knit them all flat, then sew up the seem, but this is knitting, not sewing, so this part is less desirable.  To knit in the round also requires only ONE stitch - knitting.  Whereas while knitting flat one must knit across one row, then purl back across the second row. (Like a typewriter - please tell me that people will still get this analogy even though I vaguely remember typewriters and playing with them as a child myself.....)

4. Little Jockey Wrap: as above, this guy is in alternation with Lucas's sweater. There is also only 1 sleeve left to do, then the garter stitch wrap part which shouldn't take too long.

For Non Knitters: this is garter stitch.  It is made by ONLY knitting each row (no purl row).  You still go back and forth like a typewriter.  Please don't ask about doing garter stitch in the round because I still have to look it up each time I do it.

5. Baby Quilt.  Well this one was a doozy!  I got asked to make a baby blanket for friends Josh and Rachael who are due with a little girl anytime now.  (For the record, I offered any combination of knitted items but a quilt was specifically requested.) So I went to the quilt store and bought some fabric (actually the ladies in the quilt store picked out fabric that I didn't really like so when I got home I just made it work.) So I cut out the pieces - oh a list is probably easier:
 Notice that there are NOT close-up pictures of this quilt.  This was on purpose. 

A. Pick out fabric.  Change your mind and come up with a different plan.

B. Pick a pattern.  This was going to be simple squares sewn into a rectangular shape.  Easy Peasy.

C. Cut out pieces.  I have been getting better at using the rotary cutter and more and more of my pieces were actually the right size this time.
D. Sew top together.  Finished top will look like this (above).

E. Decide to quilt the quilt yourself.  Have your husband go to Joann Fabrics to buy quilt batting.  (this part is just funny). (Having a quilt be quilted for you is rather expensive.  In fact, this whole hobby is expensive but don't tell my dad that because my mom has been hiding receipts from him for years....)

F. Have husband remember to bring in quilt batting.  Then set up your QUILT SANDWICH. (The tutorials on that site helped me through the whole process and gave me the gusto to actually attempt this on my own.)

G. Using safety pins, pin together your top, batting and backing.  Look at back and realize it is not flat then start all over again.  Then be happy with the couple of wrinkles and push on.

H. Go to quilting store to buy a WALKING FOOT.  Let them laugh at your Target purchased sewing machine.  Let them gasp when you state you are going to attempt quilting something yourself.  Let them be horrified when you purchase bright purple thread with which to quilt.  LET THEM. And buy your walking foot.  

I. Go home and start quilting!  (In the 1950's cartoons someone would be saying "Now you're ready to start quilting!" Figure out how the walking foot goes on only AFTER you've quilted nearly the entire quilt. Learn about your TENSION problem after you've quilted and ripped out nearly the entire quilt.  By no means actually KNOW what you're doing when you start.  Use YouTube videos for learning each step.  DO NOT ASK FOR HELP - IT IS A SIGN OF WEAKNESS.

J. Apply the binding.  Again, I cannot stress enough to you the helpfulness of YouTube when doing all of this.  I would literally stitch a little, then go watch a video, then do some more sewing.  

K. Cut off all the loose strings and fix whatever you can.  

L. Wrap in pretty paper.  For the love of all things holy, DO NOT show this to anyone who remotely knows anything about quilting.  Show it to husbands, non-sewers and random strangers who will compliment you heartily on your efforts.